Installing supOS Platform
Preparation
✅A Ubuntu 20.04.2 server for supOS
✅A Windows server for X-Collector
✅A USB dongle burned with authorization file or just an authorization file
Authorization Management
The platform can authorize the dongle through a USB or an authorization file.
Generating Authorization Files
- The authorization file collects the server fingerprint and is bound with the current Ubuntu system and network environment.
- Reinstall the system will invalidate it, migrate the authorization before reinstalling the system. For details, see Migrate Authorization.
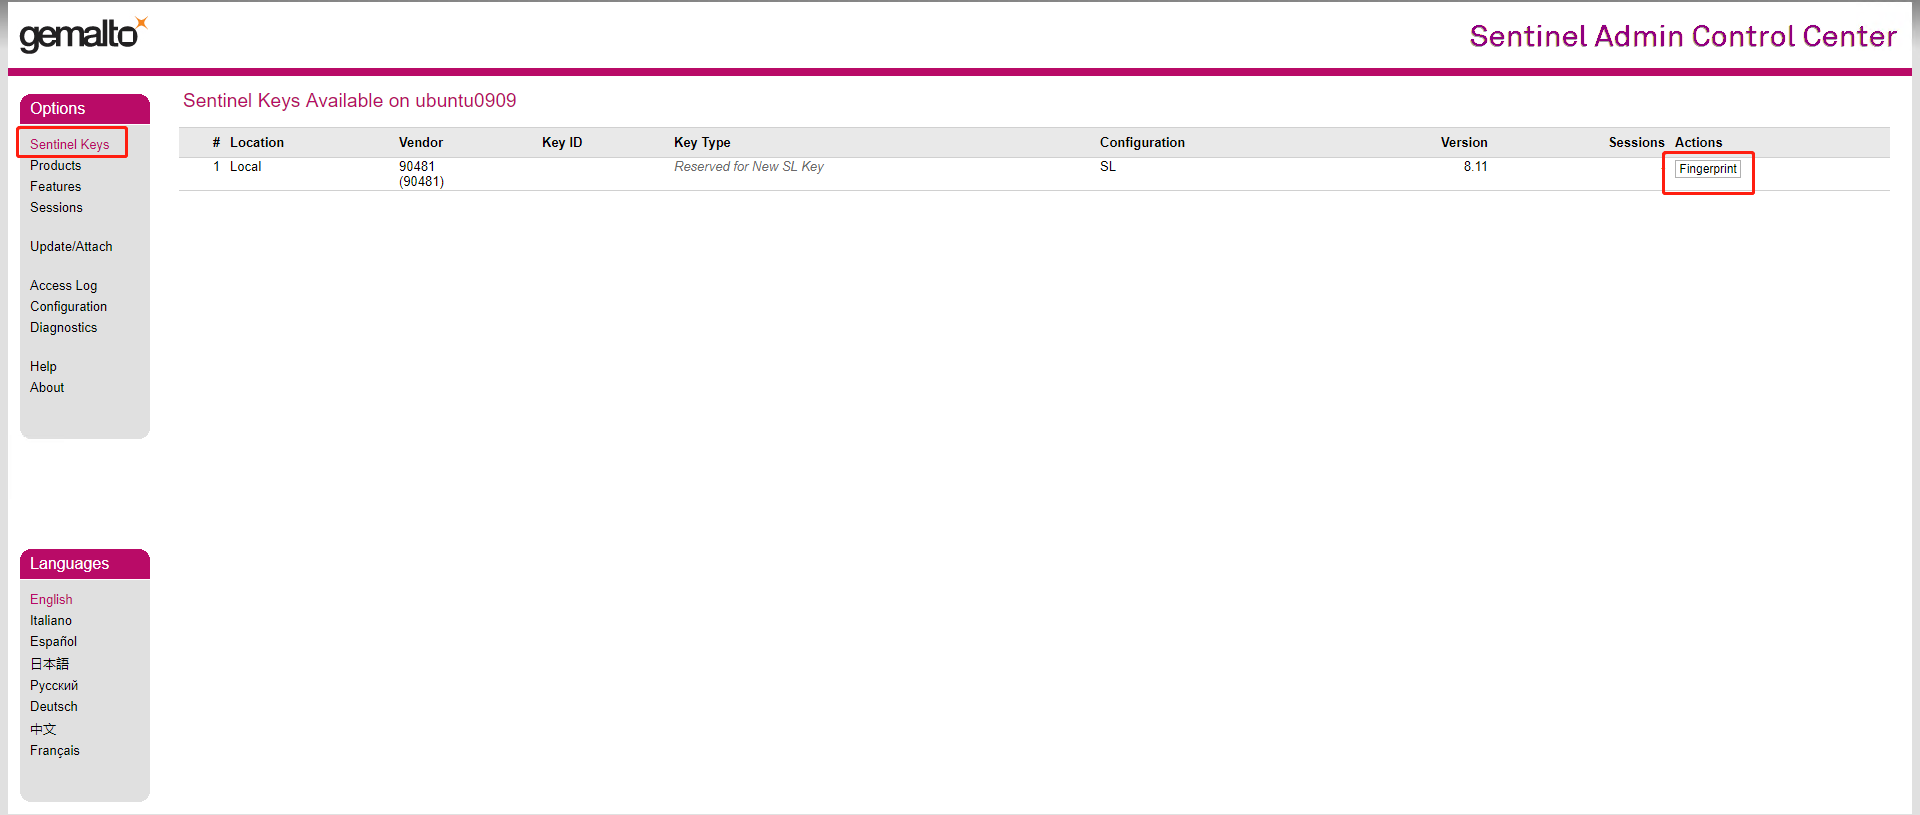
- Access "http://<server IP>:1947" through a browser, and then log in to the authorization back-end.
- Click the Sentinel Keys tab on the left, and then click Fingerprint to generate and download fingerprint_xxx.c2v the authorization file.
Send the file to technical support for authorization and then get the authorized .v2c file.
Select the Update/Attach tab on the left, and then click Select File, upload the .v2c file.
Check the authorization result under the Sentinel Keys tab.

Installing Authorization Dongle
Install the authorization dongle on the server.
Insert the dongle into the server.
infoIf the supOS is installed on a virtual machine, make sure the dongle can be recognized on the VM management software. For details, see the corresponding manual.
Run
lsusbcommand to list all USB devices connected to the server.
The dongle is successfully installed if the following figure shows.
Install and configure Ubuntu Server
Installing Server
Proceed installation and create 3 logical volumes for mount points.
| Mount Point | Minimum Disk Size | Recommended Disk Size | Function | Mount Name | Description |
|---|---|---|---|---|---|
| /volumes | 200 G | 1200 G | supOS system data storage | lv00 | If data volume is large, increase the disk mount size. |
| /home/supos/supos | 100 G | 200 G | supOS installation package | lv01 | - |
| /backup | 200 G | 200 G | Backup file storage path | lv02 | Adjust the disk size based on actual backup file size. |

Configuring Server
Enable root account
Open SSH configuration file.
sudo vi /etc/ssh/sshd_config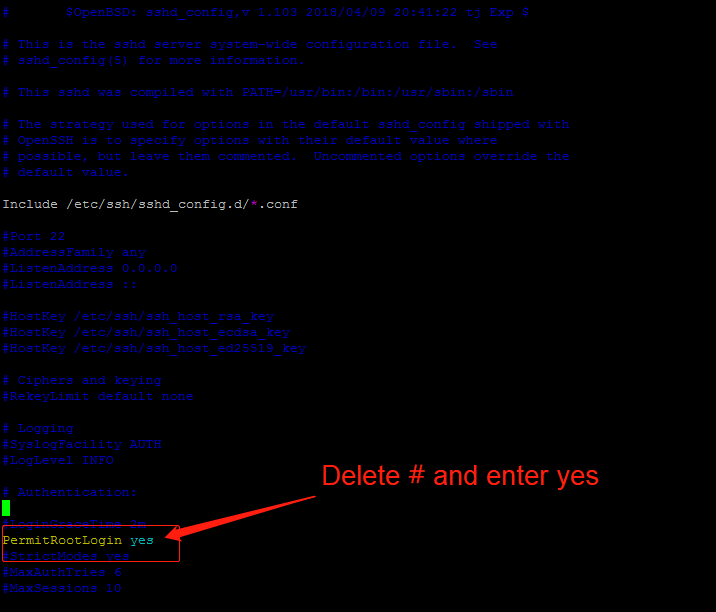
Press ESC to exit editing and then enter
:wqto save the file.Restart the service.
service sshd restartSet the password of the root account.
sudo passwdSwitch to root account.
sudo su
Modify time zone and server time.
Configure time zone accordingly.
- Copy time zone file.
- Use
datecommand to check the current time and time zone. - (optional) Set date and time.
Set date:
date -s 06/03/2019Set time:
date -s 17:55:54- Write system time to hardware.
- Check whether the system time (
date) matches the hardware time (hwclock).
cp /usr/share/zoneinfo/Asia/Shanghai /etc/localtime
hwclock -w
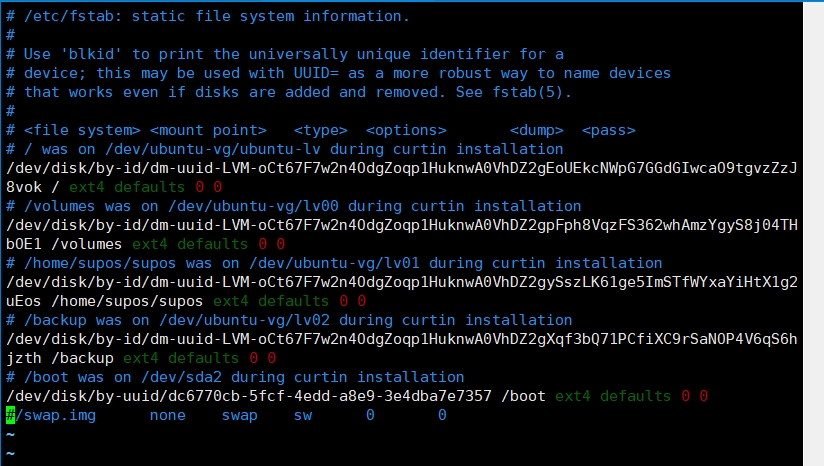
- Turn off the swap partition of the server
- Execute
swapoff /swap.imgto turn off swap. - Execute
free -hto check whether the swap partition is successfully turned off. - Open the configuration file.
- Comment out the line with swap (add a #)
- Press ESC to exit editing and then enter
:wqto save the file.

vi /etc/fstab
(optional) Install tools.
apt install sysstat net-tools sysbench fio zipConfigure the static DNS.
Delete /etc/resolv.conf.
rm -f /etc/resolv.confOpen the /etc/resolv.conf file, press i to start editing and add a nameserver.
sudo vi /etc/resolv.conf
Turn off the default firewall.
sudo ufw disable
Installing supOS Platform
Create directories under /home on the server for supOS installation package and the platform.
/home/supos/supos/downloads: For the installation package.
/home/supos/supos/opt/supos: For supOS platform.
Copy the installation package to the created directory.
cp xxx/supOS-V4.xx.xx.xx-C-xxxxxx.zip /home/supos/supos/downloadsDecompress the package to /home/supos/supos/opt/supos.
cd /home/supos/supos/downloadsunzip supOS-V4.xx.xx.xx-C-xxxxxx.zip -d /home/supos/supos/opt/suposSet supOS language.
cd /home/supos/supos/opt/supos/bincp env.sh.tmpl env.shvim env.sh
Install supOS.
cd /home/supos/supos/opt/supossudo bash install.shCheck the service status after installation.
kubectl get po
- supOS will automatically start after installation. You can also manually start by
sudo bash start.shunder home/supos/supos/bin folder. It takes at least 300 seconds to start the whole system. - You can ONLY stop supOS system using
sudo bash stop.shunder home/supos/supos/bin folder
Uninstalling supOS Platform
You can select to only delete the programme file without clearing data or delete all data when uninstalling the platform from the server.
Once you uninstall the programme, the original configuration files such as “env.sh” and “dlake.json” will be backed up and renamed to “env-xxxxxxxx.sh” and “dlake-xxxxxxxx.json” respectively. Rename them to the original names when installing the platform with the original configurations.
- Uninstall supOS platform.
Switch to the bin directory under the supOS platform installation path.
cd /home/supos/supos/opt/supos/binUninstall the programme and wait for it to finish.
sudo bash uninstall.sh
- Uninstall the programme and clear all data.
Switch to the bin directory under the supOS platform installation path.
cd /home/supos/supos/opt/supos/binUninstall the programme and clear all data.
sudo bash clean-all.sh